Palmtree Panic-Sonic the Hedgehog CD
Palmtree Panic
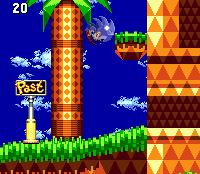
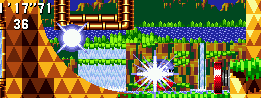
A wonderfully bright and happy tropical paradise stage not at all unlike Green Hill Zone. Tonnes of springs will throw you around all over the place and you can spin through crazy winding tunnels or find secret passages in internal rock sections. The Past is a prehistoric jungle while the Good Future has water flowing freely, but the Bad Future is a polluted metal hell. A very short, simple stage that you can whip through with few problems.

Game: Sonic the Hedgehog CD

Stage Number: 1

Level Division: 3 Zones

Boss: End of Zone 3

Playable Characters: Sonic

Difficulty Rating: 1

Music:
- The Japanese version is quite possibly the happiest piece of Sonic music that will ever be made, complete with the sounds of cheering kids, catchy tunes and a dash of piano. The Good Future version is a happier extension of the Present theme, while the Bad Future is more of a heavily distorted remix that keeps the tune but loses the happy groove. The Past theme for both soundtracks is based on this tune and has more of a prehistoric flavour to it. Still quite happy, but the cheering kids are ditched.
- The American Palmtree Panic Present tune is one of the better examples of Spencer Nilsen's soundtrack, and features a happy Latino style. The Good and Bad Futures sound a bit more tribal, with some additional vocal work to emphasise this, but they're quite similar to each other, mood aside.

Typical Length:

Zone 1: 40 seconds - 1 minute
Zone 2: 40 seconds - 1 minute
Zone 3: 30 - 50 seconds
(Note: These times do not account for any time travelling exploits required).

Available Items:

Rings Checkpoints Past Posts Future Posts 10 Ring Item Box Shield Item Box Invincibility Item Box Speed-Up Item Box Extra Life Item Box
Zone 1
Present 116 3 3 3 6 2 2 1 2
Past 154 0 0 6 10 3 4 2 0
Good Future 152 0 3 0 10 2 4 3 2
Bad Future 152 0 3 0 10 2 4 3 2
Zone 2
Present 212 5 5 5 4 2 2 2 0
Past 214 0 0 6 3 1 3 1 2
Good Future 212 0 6 0 2 1 4 2 2
Bad Future 212 0 6 0 2 1 4 2 2
Zone 3
Good Future 70 0 0 0 3 1 2 1 1
Bad Future 70 0 0 0 3 1 2 1 1
Top Tips
- Best methods of time travel are usually the winding tunnels in the ground (although you can sometimes get stopped dead in them at certain places, ruining your momentum), and curves in the wall and ground, with a horizontal spring opposite that can send you into it. Using these, you can be thrown up into the air, and fall back down the curve and repeat. Also try approaching the spinning grey turntables with speed, and there should be enough past or future signposts dotted around the place for you to use.
Each section of this page allows users to add their own notes to fill in any missing details or supply additional research etc.
View general notes for Palmtree Panic (4)
#1. Comment posted by Indigo Rush on Wednesday, 1st April 2009, 11:14am (UTC)
(To Anonymous)
That applies to the whole game, not just Palmtree Panic, so there's a reason that's not included.

I can't think of anything that's missing from this analysis. Good show!
#2. Comment posted by Brandonthehedgehog on Tuesday, 23rd June 2009, 6:40am (UTC)
In the boss, when eggman is coming down, you can go to the far right of the screen and get several good hits out of him without taking damage.
#3. Comment posted by Sonicfan32 on Tuesday, 12th July 2011, 5:27pm (UTC)
The American soundtrack for this game was inspired by a latin jazz song that was popular at the time.
#4. Comment posted by Anonymous on Tuesday, 25th June 2013, 4:37pm (UTC)
In Palmtree Panic zone 1, I found a glitch. When I came out of that giant 3d loop on the beginning of the level, I accidentaly hit the Butterfly badnik. I was actually spinning so I destroyed it and went back in the air. Then I went back to the left, and...
...I landed on (or rather in) the top of the loop the loop!
Hide Notes
Appearance
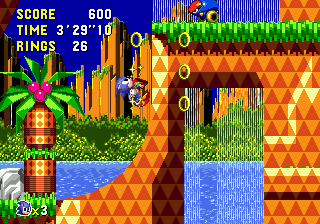
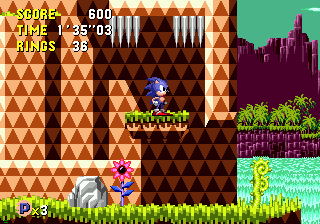
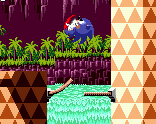
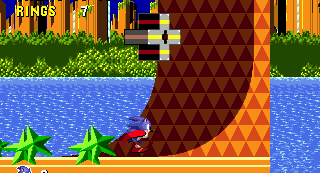
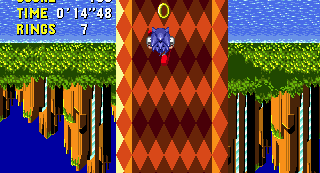
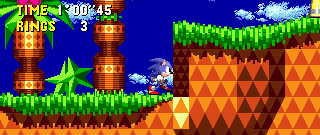
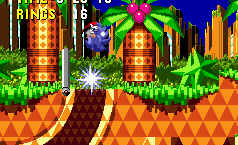
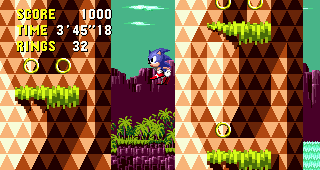
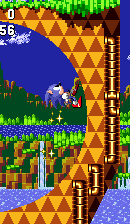
To the untrained eye, the present version of Palmtree Panic is basically Green Hill Zone. The expert Sonic player however, will be able to spot numerous differences, but nevertheless, there's no denying that many of Sonic CD's levels closely resemble those of Sonic 1. The common tropical paradise is back in full form, complete with orange patterned ground and colourful plants below a blue, cloud-filled sky, although this level is a little more exotic than Green Hill, and graphics are more detailed. Tall, straight rocky orange mountains soar upward across the background with waterfalls cascading down them, and rows of thick greenery and a bit of water, perhaps a small lake, separate the background from the foreground. Hillsides inherit the bright orange colours, but the patterns are based on triangles rather than squares, and a variety of interesting shapes are made in the extrusions and intrusions in the rock. Quite often tall bumps similar to the mountains in the background, and internal areas consist of a darker patterned background. Decoration across the grassy paths rely on two pieces of plant-life; large spiky green leaves of palmtrees on top of a thick brown patterned trunk, and green star plants positioned at crooked angles. The trunks of the palmtrees come in a variety of styles, and groups of the stars may congregate in the air at certain places along the top of the stage.
Palmtree Panic features the backdrop of exotic rocky skyscrapers piercing the rich blue sky, waterfalls tumbling and all.
Also featured is the obligatory background lake, as in many similar stages, nicely decorated palm trees and a more triangular twist on the standard hillside checkered pattern.
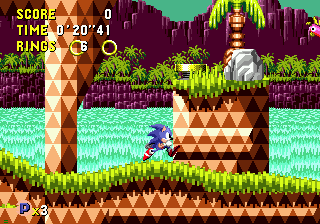
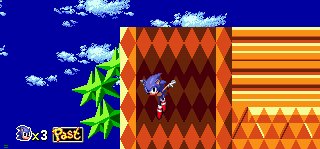
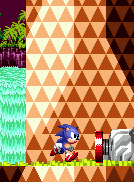
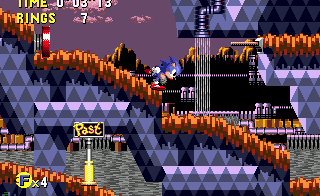
In the Past, Sonic returns to the time of the dinosaurs, and the world is quite a different, pre-historic place. The dark blue sky has turned to a dull green and the tall orange mountains are much smaller, stubbier purple ones. In front, the landscape more resembles Green Hill, with a larger lake, and palmtree-covered rocks dropping waterfalls into it. The whole lake appears to drop down into a wide waterfall along the bottom. The foreground is generally a duller version of the Present, and the orange hillsides are much lighter, with turquoise waterfalls in the foreground. Duller palmtree leaves sit atop different patterned trunks, some with a kind of light blue bulb on top, and where there will be star plants in the Present, there are spiky vines growing out of the grass, curled up at the ends.
The Past goes way back, with ancient plantlife and stumpier background mountains.
The whole colour scheme, even the sky, has a duller and greener tone to it.
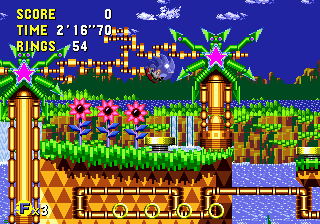
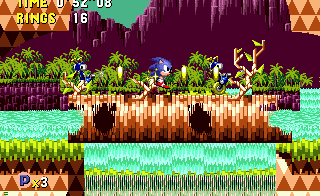
Allow a Good Future to blossom and you'll notice a similar appearance to the Present, except that all the water is much more controlled now, running along in efficient pipes and tubes all over the stage. It all looks very bright and happy, with clouds drifting by quickly across a slightly lighter blue sky, and stubby, rocky brown misty mountains in the distance. The larger lake drops waterfalls down into a lower portion, surrounded by rocks and light green forestry. The foreground hillsides are much the same as in the Present, although a little less vibrant orange, and as I already mentioned, there are tonnes of gold pipes carrying lovely fresh water everywhere. You can see it running horizontally in some half open pipes just below some grassy surfaces, and dropping between vertical tubes. The palmtrees are given a nice futuristic makeover with leaves made up of green coils and arrows, and a glowing pink star in the middle of each, plus more pipes surrounding them. The star plants are now shining away in blue and green, and of course there are the necessary frolicking animals and seeds sprouting purple flowers aplenty.
The Good Future goes a bit crazier, with lighter, happier colours and pipes carrying clean water all over the place.
All those natural hillsides have been given a straightforward conversion to cold hard metal, with the grass and plants reduced to drooping, rusty pieces. A foreboding sky and river finalises Eggman's take on the tropical paradise level.
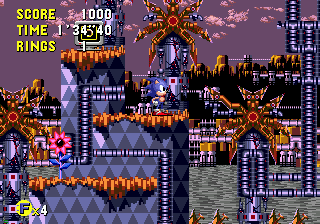
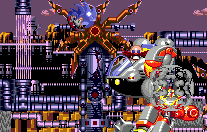
The Bad Future is a massive departure from the happy, bright style of the other time zones. It's metal, it's gloomy and it's not the kind of place you want to spend your holidays. That's right, Eggman has seized control and the once beautiful, pure water now flows in a grey and dirty river across the background. The sky is a very dull, dreary purple colour, and the mountains dark, and overrun by mechanical pipes and silos. The hillsides now appear to be made of metal with a rusty orange coating where grass used to be, on top. The water pipes, as seen in the Good Future, now carry nasty, polluted pink water, and the metallic palmtrees and star plants are similar to those seen in the Good Future, but are decayed, cracked and withered. An ominous light glows red across them, amongst the orange leaves and metal trunks.
View Notes(2)
Go to..
#1. Comment posted by David on Monday, 20th September 2010, 3:25pm (UTC)
Hi It's me David,The Stages Are Not Only Similar The Music Is also Similar Following Similarities Are Music And Stage Design Green Hill/PalmTree Panic Marble/Quartz Quardant Spring Yard/Collision Chaos Labirinth/Tidal Tempest Star Light/Stardust Speedway Scrap Brain/Metallic Madness Oh By The Way The Past Music Is Has The Closets Resembleness To Sonic 1's Music
#2. Comment posted by David on Monday, 7th February 2011, 3:33am (UTC)
And I Made Names Of Each Level In Each Time Zone
Note These Names Are Mine Don't Use Them. Thank You
Past Prestoric Park
Present Palmtree Park Bad Future Filthy Factory Good Future Pleasant Paradise Good Future (without Metallic Palmtrees)
Palmtree Paradise
If This Is Not Wanted Delete It I Don't Want To Make A Hassle
Hide Notes
Structure
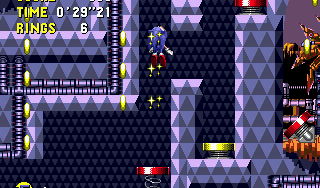
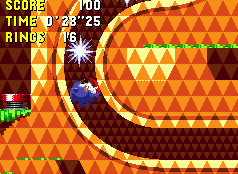
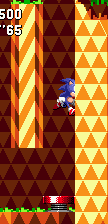
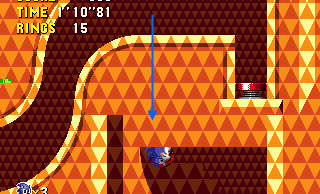
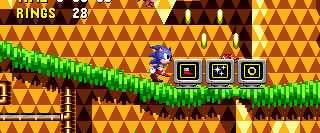
Structurally, this level is also very similar to Green Hill Zone, more-so than any other levels of this type since, really. The level leads in a straightforward, left-to-right direction, flowing very freely and quickly, and takes place on platforms of various sizes. Like in Green Hill, few paths are simply suspended up in the air, and are instead supported by the orange checkered ground, and the ground that provides a foundation for the higher platforms makes for a backdrop to the lower routes. Zone 2 tends to employ thinner, bridge-like structures, with many interesting curves and arches. It's a pretty speedy place, with standard Sonic loop-de-loops requiring some decent acceleration beforehand to get through, and twisting, winding internal tunnels that Sonic will spin through and fly out the other side. The pathways are predominantly straight, but can feature numerous slopes and hilly bumps, or separated into short platforms and steps, and while most of the level is out in the open, small, enclosed internal rooms and passages often have hidden surprises behind breakable walls, ceilings and floors. Narrow vertical spaces are common down here, trademarked in Zone 1 by a recurring formation of three pieces of tall, thin ground arranged in a row, often with springs or turntables on top and at the bottom of the gaps below.
Wouldn't be complete without them - run through the loop-de-loops at speed or you'll never pass through.
The terrain is often segmented into small chunks built up close together.
Internal passageways can be quite narrow and complex.
Spin through these twisting internal pipes - some ideal for time travel, others though might have a tendency to stop you dead in your tracks at certain points.
If you time travel in an open area that is replaced by solid ground in the new time zone, ledges (some visible, some not) have been put in place for you to find your way to the surface with, under virtually any circumstance.
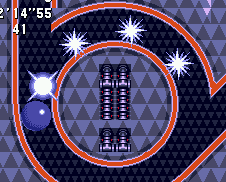
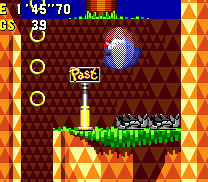
The pathways are positioned at various vertical points, often forcing you to leap between them, and they can form multiple routes this way, arranged in linear patterns that are stacked on top of each other as they all head right. There can be two or three brief paths on the go at once, but because the level is so open, you can easily chop and change between the vertical options by using springs and moving platforms, etc. You can usually backtrack across most of the level if you need to, although entrance-only winding tunnels may make that a bit difficult in certain places, for some time zones. One of the most interesting structural features of Palmtree Panic is found on two occasions in the Present, where the game momentarily forgets its a perfectly flat 2D side-scrolling adventure, and has Sonic running through a huge pseudo 3D loop, as he faces away from us while he runs (see Point #1). This physically huge feature makes the layout for the Present a little bit different to the other time zones, and it even starts off at a completely different, lower place than the others can even reach. When you travel through time and wind up in a place that was once full of playable ground and objects, but is now solid rock, you'll notice that little thin grassy cuttings in the ground (which you can only stand on when this happens to you) will allow you to hop your way back up to the surface across them, so you shouldn't fall to your death. Hopefully.
View Notes(0)
Go to..
No notes have been posted in response to this section.
Hide Notes
Obstacles and Features
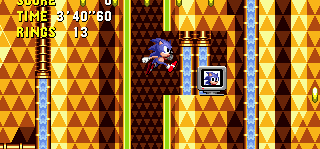
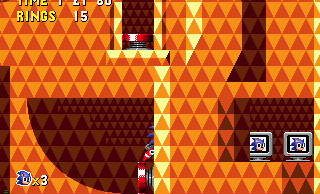
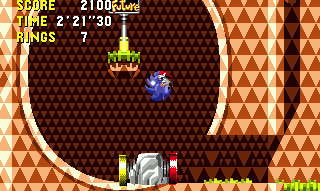
Like any first level, Sonic CD's offering has the usual tricks, such as relatively wide moving or falling platforms, spikes, ledges and thin pathways that collapse when you stand on them, swinging pendulum platforms on chains, and Green Hill's small unmovable boulders, standing in your way at random places (now grey, not pink-ish). Also, lots and lots of springs in all varieties, including ones that cart back and forth on a little wheel. When you spring or spin up through tunnels, a small white hatch on the ground above will open to let you through and then close to deny you access back down there, and when you're walking around down in those internal rooms, some flimsy, fake walls can be knocked down by jumping at them, opening up a secret passage.
Hatches will open for you when you're shot up through them, but not the other way.
The standard moving platform - vertical, horizontal or quite often, diagonal.
Collapsing ground, not just on protruding ledges but now also part of thin walkways in the middle of a path.
The swinging pendulum platform.
Breakable walls in internal sections are knocked through with a jump or a roll.
Commonly found atop a series of tall, thin rocks that you can fall between in the lower regions of Zone 1, small spinning grey turntables will send Sonic round and round, but you can usually step off or jump with force. They are useful for time travelling though, because if you can hit them with enough speed, you should be able to maintain your time travelling stars whilst spinning round, although you can't always rely on being able to stay on them for long enough. If you fall between the gaps of these tall internal rocks, you'll find a horizontal passage below with a spring to take you back up.
These spinning turntables are fairly self-explanatory, but can also be used for time travel purposes.
In the Present, these platforms are invisible until you step on them..
..While in the Past, they are always visible..
..In the Good or Bad Future, they're also constantly visible but slowly drop as soon as you stand on them.
A bit like bouncy flag poles in more recent games, these flick you upwards, higher on each bounce.
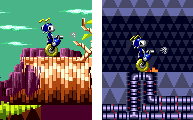
One object that changes depending on the time zone are little tiny, 6-sided, almost emerald-like platforms that appear up in the air and between pathways, and coloured according to the foreground of the time zone. In the Present, they are only visible when you step on them, making a series of them very difficult to use to get anywhere without falling a dozen times first. In the Past, they are always visible and reliable to stand on without them moving, but in the future (both good and bad), though they may be visible, they also begin to slowly fall as soon as you step on them, but like most things, will return once you leave the area and come back. Regardless of the usually minor structural changes, these small platforms, like rings, appear to remain in the same places across all time zones. In Zone 2, in all time zones but the Present, there are one or two little bendy poles on ledges and walls, an object that would normally be more at home in a Sonic Advance game. The higher distance you fall onto it from, the higher you'll bounce back up.
Mosquito badniks, old and new.
Butterfly badniks, old and new.
Beetle badnik, old and new models look the same.
Ant badniks, old and new
Crab badniks. There are no older models.
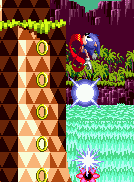
There are five enemies to contend with across Palmtree Panic. First up is a needle nosed mosquito robot that tends to hang out in groups, flying back and forth in straight lines just above the paths. When Sonic passes underneath, they turn and drop down to the ground, needle first, and older ones, found only in the Present or Bad Future, move slower and have a damaged needle. They can be killed in the air or when left helpless, sticking out of the ground. Pink butterflies with yellow wings also offer an aerial assault, fluttering up and down quite a way as they slowly float left to right. Broken ones have holes in their wings, and a tough time keeping up with their newer siblings. Cool looking blue and red beetles not dissimilar to Moto Bugs roll back and forth along the ground, and stop occasionally to produce a couple of circular projectiles from rear-mounted pipes, which come flying out either side a fair distance. Older models don't show their age, but they trundle around slower and although they also stop every now and then, they've run out of projectiles to throw. Unicycling blue ants (that's right) simply jitter back and forth along a path, and the damaged version is predictably slower and, unpredictably, looks rather tearful. Finally, big blue crab-like bots that can only be found in the Bad Future and Present, and have only one form, leap in and out of the streams and waterfalls as you pass by above. These enemies produce pink flowers, with blue stems and black stigma.
View Notes(2)
Go to..
#1. Comment posted by Ajavalo on Sunday, 15th March 2009, 5:07pm (UTC)
You say that "crab-like bots" have only one form. Well, you are wrong, they have an older version like all the other badniks: the new version has spikes in its back and it can jump higher and faster than the old version, wich doesn't have any spikes. Strangely enough, the new version appears also in the future!
#2. Comment posted by Anonymous on Wednesday, 20th July 2011, 8:07pm (UTC)
Thats Tidal Tempest.
Hide Notes
Zone 1
Zone 1 Present Map (PNG format)
Zone 1 Past Map (PNG format)
Zone 1 Good Future Map (PNG format)
Zone 1 Bad Future Map (PNG format)
In either the Good or Bad Future, drop down to the lower route the first chance you get, from the start. Head backwards to the left, down into a cave that then springs you up here to this sparkly new 1-up.
Spot this nice, unusual sprite of Sonic's by dropping down from the top of the second 3D loop.
View Notes(0)
Go to..
No notes have been posted in response to this section.
Hide Notes
Point #1
Just head down the first slope in the Present and you'll meet a giant loop where Sonic breaks his strictly 2D rules for a moment and changes to a pseudo-3D angle as he enters it. A propeller above will send him upward as the camera goes behind and above him as he runs through this giant loop. Notice that the background goes upside down, to simulate Sonic running upside down in the loop himself, but really, it's just a long path going straight upward. At the top, Sonic is flung out and lands at the next area, now on a much higher plane of the level's map than he was when he started. There's another one of these towards the end of Zone 1 Present, but it's not as long and the background remains right side up. Try dropping back down it or entering slowly to spot some unusual Sonic sprites.
Sonic CD kicks off in style with this massive loop that can't even fit inside the 2D map!
A nice trick, the background turns upside down to suggest that Sonic is now upside down, inside the huge loop.
View Notes(0)
Go to..
No notes have been posted in response to this section.
Hide Notes
Point #2
Another cool, unorthodox feature can be found by taking the following directions. After Point #1, touch the checkpoint and hop up onto the higher ground just to the right of it. Continue on this upper path and jump across to the following collapsing ledge, and you'll find both past and future signposts soon afterwards. Don't go into the winding tunnel next to them, instead jump onto the small green platform just above the tunnel, and jump upward, using a small invisible platform that will appear to allow you to get to the top of this rock. Don't fall down through the collapsing floor, carry on right, across the series of moving/falling platforms along the top of the stage, taking a big leap of faith off the third one to arrive at the place I'm trying to tell you about in this point..
To get to the unusual feature, take this route, above the tunnel.
A solid wall? Think again. Walk through and you'll dart around at light speed in all crazy directions in the ground, until breaking out down below..
lol.
This funny little trick will work in both the Present and the Past. If you go straight to the wall right ahead of you here, you'll notice that you can step inside it into a little secret internal entrance behind the foreground rock. Go in further and you'll start to zip through a crazy, winding tunnel inside the ground that you can't see, but it'll throw you round at incredibly high speed. The slightly amusing part is that where it drops you off at the bottom of the level, Sonic will break out, leaving a Sonic-shaped hole in the wall, in his dying pose. In the PC and Sonic Gems Collection version of the game, you can use this feature to time travel, but on the Mega CD version, you're just short of enough time to reach the required number of seconds.
View Notes(0)
Go to..
No notes have been posted in response to this section.
Hide Notes
Time Travelling Tips
The first winding tunnel is the ideal place to break your time travel virginity, as it were..
..The tunnel isn't long enough to contain the full voyage, but you'll be sent high into the air the other side, where you can easily make the warp.
In the Present, the first, and usually pretty reliable method of time travel would be to take the first winding tunnel I mentioned in Point #2, which you can get to by taking the upper route after the first checkpoint. There's even both a past and future signpost right in front of the entrance too, and when you come out, it might help to try and bounce off of the nearby butterfly enemies to maintain your momentum, as you're hanging in the air. If you want to time travel when in the Past, don't use its version of this tunnel, as it has a spring at the end that just throws you right back out, and you tend to stop dead in the tunnel for some reason, before you can warp. In the Good and Bad Futures however, the tunnel contains a loop and leads straight to the outside, making time travel possible, though to be on the safe side, you might like to perform a peel-out into it from as far back along the path as you can. The really fool-proof method for the PC/Gems version of the game is to take the second, hidden tunnel I mentioned in Point #2, which would normally leave a Sonic-shaped hole in the wall at the bottom. However, this is a bit harder to get to, and is difficult to backtrack to if you miss your chance. It is available in both the Past and Present. If you try it in the original Mega CD version of the game, you won't be successful, as a full five seconds are required for time travel, rather than three in the later versions.
In the Futures, the tunnel features a loop in the middle. You might like to take a spin dash or peel out into it as far back as you can go before the entrance, in order to ensure success.
Turntables will keep your momentum going, when you land on them after a run up from the side. Just try not to fall off.
In the Past near the end, this spring sends you through a loop on the left and up a curved wall..
You can simply run up the wall, then fall back down it (leave the D-pad alone) to maintain your speed.
In all the time zones, you can try your luck with the spinning grey turntables, normally found on top of the thin chunks of ground in a couple of places. Run into them having already obtained top speed and you should be able to keep your stars as you spin around. If there's a line of them they may carry you along the line or you may fall off yourself, but it's not too hard to stay on. Perhaps a safer alternative, there are also a few places where a horizontal spring can send you up a curve and into the air, and if you can fall back down the curve and run back toward the spring to repeat the process, you should be able to maintain suitable momentum. In the Present, there's one of these on the upper route just after the first checkpoint (also there in the Past), and another just before the second big pseudo-3D loop thing, towards the end. In the Past, there's a regular loop-de-loop towards the end of the zone at the bottom, near the place where the machine is, and there's a curved wall on the left of it, and a powerful red spring facing it on the right. You'll find that in the future, there aren't many of these spring/curve structures to take advantage of that don't have a platform above the curve that you will inevitably land on. Your best bet is to utilise the looping tunnel mentioned above, or the turntables. Failing that, as always, just try and find a long, smooth patch that you can run along.
View Notes(0)
Go to..
No notes have been posted in response to this section.
Hide Notes
Metal Sonic Hologram Location
Metal Sonic's hologram is being generated just to the left of where you come out of the hidden tunnel described in Point #2, in the Past. It's along the lowest route in a more enclosed section, just at the top of a fairly high ledge, with springs at the bottom. Destroy the generator on the right to let the animals roam free once again.
'..ahem..'
View Notes(2)
Go to..
#1. Comment posted by Anonymous on Thursday, 9th April 2009, 11:05pm (UTC)
What happens if you destroy the holograms.
#2. Comment posted by LiQuidShade on Friday, 10th April 2009, 2:51pm (UTC)
The animals will jump around freely throughout the zone, as they do in the Good Future. Sorry - general details like those are still to come, in the gameplay section.
Hide Notes
Point #3
A hidden passage in the wall..
Palmtree Panic is full of little nooks and crannies hidden away in the ground, often with solid ledges or openings that aren't easily identifiable. There's a spot so well hidden in fact that they've decided to put not one but two extra lives away in there. In the Present, play towards the end of the zone, just before the second 3D style loop and runway, which precedes the machine location. A bit to the left of the loop, drop down into a cave - one of those internal areas with three narrow pieces of ground. Drop down through the right-most gap and hold right on the D-pad, against the solid wall as you fall, hopefully finding your way into a hidden corridor. Follow this through, behind the foreground and down into a curving tunnel that leads upwards. Use a red spring embedded into the wall on the left. Up here take another spring on the lower right, which takes you up to a top left corner, forcing you to fall down into a hidden hole in the floor. When you get through, be careful not to let the awaiting spring below send you back up straight to the surface. Instead, jump over it into the wall and you'll see the two extra lives in a little space to the right, behind a hidden corridor. If you do accidently go back up to the surface, you can always go back and try the whole thing again.
Use the spring to force you into a corner above, and you'll then drop straight through this hole in the floor.
Avoid the spring, and the lives are yours for the taking.
View Notes(3)
Go to..
#1. Comment posted by David on Monday, 27th December 2010, 1:10pm (UTC)
By The Way You Missed One As You "Said Nook And Crannies" When You Go To That Area In That Screenshot Above
Go Back To The Invisible Opening That one That Got You There To Begin With You Should See On The Outside(while You Can't See Sonic) You Should See 2 Ridges In The "triangle Patterned Hills" Go In The Middle Of It Jump And You'll Come Out Of The Ground!
#2. Comment posted by Oobo on Thursday, 10th February 2011, 8:56pm (UTC)
2 1-UPs in a row? The only other times ive seen that are in carnival night zone and a hack of sonic 2! Sweet!
#3. Comment posted by SonicTailsKnuckles on Monday, 21st January 2013, 10:42pm (UTC)
It's not often you see two free men together. Awesome!
Hide Notes
Machine Location
Machine Location
Hop between the platforms, up these two tall spiring rocks..
The machine you must destroy can be found at the top.
In the Past, the machine you need to destroy can be found just before the end of the zone, atop a pair of very tall, narrow cliffs that have alternating platforms leading up to them, in the rock. The platforms start quite high up, but there are a number of ways you can get up there. At the bottom, to the right of the nearby loop-de-loop, a hidden red spring embedded in the corner of the ground, against the wall, will throw you upward towards them. With enough momentum, you can also use the platforms on a smaller cliff to the right, and jump across, or, use the diagonally moving platform that travels between the top of the loop and the cliff's platforms. Hop between the alternating ledges as you ascend the cliffs and you'll find the machine at the top on the right, guarded by a beetle robot. Jump into the machine to destroy both and bring harmony to Zone 1.
View Notes(0)
Go to..
No notes have been posted in response to this section.
Hide Notes
Point #4
'She'll never see me behind the- Aww, damnit.'..
'Ah, ah, get away get away'..
'....ugh'.
In the Present, if you head towards the end of the Zone, Sonic will make history and have what is presumed to be his first encounter with his #1 fan, Amy Rose, and boy is he going to regret it. Understandably, she's rather chuffed to meet him and immediately walks at a quick pace towards him, hearts floating up out of her head. If you hang around near her, she'll follow you around relentlessly and when you're still, she'll either stand there trying to look pretty, or actually try to latch onto you, which she manages to do sometimes. On such an occasion, Amy will emit a small girlish giggle and a complete stream of floating hearts, and you will be unable to move until you jump out of her suffocating grasp. Her space is limited to the hill between the last, small cliff and just before the goal arrow signpost so she thankfully can't follow you around the whole level.
View Notes(4)
Go to..
#1. Comment posted by David on Thursday, 30th September 2010, 8:30pm (UTC)
(Above part with amy and sonic)
very Funny :) but Poor Sonic :(
#2. Comment posted by David on Monday, 7th February 2011, 3:16am (UTC)
Hi I'm Adding From My Last Comment Above.I Think That Sonic And Amy Thing Above Should've Went Like This 1 Panel:"There's No Way Amy Will Find Me Behind Here...Oh Shoot
Panel 2: Leave Me Alone Panel 3: I Tell Ya There's Something Wrong With This Girl"
Note Maker Of Zone 0 Delete This If You Think It's Wasting Space. Thanks (;
#3. Comment posted by top secret on Wednesday, 21st December 2011, 1:51am (UTC)
a curious fact: if you come to amy with a shield , she will try to get you but will bounce of, so the shield protect agains her!
#4. Comment posted by SonicTailsKnuckles on Monday, 21st January 2013, 10:48pm (UTC)
Sonic: She'll never see me behind the - Aww, dammit... Ah, ah, get away, get away...ugh...
That's really funny, LiQuidShade. Humour IS good, after all. :D
Hide Notes
Zone 2
Zone 2 Present Map (PNG format)
Zone 2 Past Map (PNG format)
Zone 2 Good Future Map (PNG format)
Zone 2 Bad Future Map (PNG format)
Honestly, I've no idea how you get down that lower path to that Past post, even by using time travel from another time zone. So if you're desperate for it, sorry about that. Answers on a postcard are most welcome.
Carefully use a long string of platforms, leading off to the left from a high peak near the start, to get this life in either of the Futures.
Zone 2 features some beautiful, arching structures.
Hollow tree trunk bridges can be passed across, either over or through.
View Notes(2)
Go to..
#1. Comment posted by Ajavalo on Tuesday, 10th March 2009, 2:54pm (UTC)
You say here that the past post at the start of zone 2 future can't be reached with time travelling...Well, that post CAN be reached with time travel from the present, and I think it can be only reached with time travel!
#2. Comment posted by David on Friday, 4th February 2011, 5:13am (UTC)
You Forgot One Obvious Thing AjavaloThe Time Post is Accessible Using Debug Mode But I Didn't See That It Is Accessible Any Other Way Than Debug Mode
Just Letting You Know (=
Hide Notes
Time Travelling Tips
The preferable place to warp in the Present occurs a little after the half way mark in the zone, where you will inevitably come to a loop-de-loop that leads down into an internal section, high up in the level. If you go through the loop, you'll carry on straight through a winding tunnel and be thrown out in the air the other side, giving you plenty of time to maintain top speed. If you haven't already activated a past signpost, there's one on a right platform in the internal section, just between where the loop ends and the internal tunnel begins. To get it, you need to be quite quick, and jump out to the right just as soon as you come out of the loop and find yourself heading down. In that case, it's best not to enter the loop at a great deal of speed. If you screw up and want to try this bit again afterwards, you can land on top of the loop-de-loop by heading up to the high ledge to the right of the loop, where a hidden diagonal red spring will send you flying across.
Go through this loop, about half way through the zone, but be ready to jump off at the end if you need a Past post..
..Jump out when you're through, before going straight down, and to the right is a Past post, plus ten rings and a shield.
Like in Zone 1, the following tunnel alone isn't enough for time travel, but keep going in the air afterwards and you've plenty of room for it.
Using the Past or Good and Bad Future versions of this loop and tunnel formation though is a bit less reliable, as the tunnels are different, and you may stop dead while you're in it. In order to make best use of it, grab a past/future signpost beforehand and get to the very top of the slope leading into the loop and charge into it using a peel-out or spin dash. If you need to get back to the area, you can use the diagonal red spring on the high ledge to the right of the loop (near where the machine is), as in the Present. In the future, the spring is hidden in the palmtree above.
An alternative, available in all time zones, is on the ground next to where the tunnel throws you out. You can drop down to a curve in the wall and a red spring on the opposite side of it. Like in Zone 1, you can use the spring to send yourself running up the curve, then stay in the air and fall back down the curve so that you can easily maintain your speed and repeat the process.
This curve and spring is a great alternative, available in all time zones.
This structure looks interesting, but for time travel when in the Past, it's best to use the red spring, which leads you to another on the far right.
In the Past, you can also go down lower in the level, a bit further ahead, to find a kind of internal loop structure in the ground, with a yellow spring inside that can send you around it. Grab the future signpost on the platform in the middle of it, but don't use this internal loop, instead, hit the red spring pointing to the exit on the ground, and it'll send you across to another horizontal red spring facing it, and the two will ping you back and forth until you warp. This structural formation is there in all other time zones, but it doesn't have two opposing springs nearby, so using it for time travel is a bit risky.
View Notes(0)
Go to..
No notes have been posted in response to this section.
Hide Notes
Machine Location
Machine Location
The machine that you need to destroy in the Past to enable a Good Future for Zone 2 is located on the high ledge to the right of the big loop/tunnel fiasco I described in the Time Travelling Tips, so you can literally use that to travel from the Present to the Past, fly up and land right at the machine's doorstep. If you didn't gain enough speed through the tunnel to be catapulted up there, it's easy enough to just jump up the cliff's platforms. It's perched on a small ledge at the top, with others nearby and it's guarded by a beetle.
If you used the loop/ tunnel to time travel in the Present, you'll be sent flying directly to the machine, on a high ledge to the right.
View Notes(0)
Go to..
No notes have been posted in response to this section.
Hide Notes
Metal Sonic Hologram Location
Metal Sonic can be found fooling around near the log bridge platform over some waterfalls. This can be found towards the end of the zone, on the higher reaches below a couple of pretty un-synchronised swinging pendulum platforms in the air.
View Notes(0)
Go to..
No notes have been posted in response to this section.
Hide Notes
Point #5
The spring prevents you from heading straight out of the zone before you've finished all your duties!
At the end of the zone, another tunnel structure will send you flying out into a diagonal spring at the end, which subsequently tries to throw you onto another vertical spring on a small platform. To the right of this is just the end of the zone, so if you're not ready to leave yet, use these springs to get up the cliff on the left, which varies in structure according to time zone, but it's possible to get up there no matter which one you're in.
View Notes(0)
Go to..
No notes have been posted in response to this section.
Hide Notes
Go straight up from the start to access these treats.
This is accessible by going to the top route, taking a run up and going for a massive leap of faith across. At best, you'll land, teetering dangerously on the edge.
View Notes(3)
Go to..
#1. Comment posted by Ajavalo on Sunday, 15th March 2009, 4:59pm (UTC)
An imporant note: under the boss area, there's a room reachable with debug mode (it's shown in the maps) and it contains two secret monitors never seen elsewhere in the game: a clock and an S.
#2. Comment posted by James on Tuesday, 6th July 2010, 4:13am (UTC)
In the PC version, charge up a super peel-out on the left-hand ledge and jump as you reach the edge while holding right. I found that you can actually manage to jump over the ring and extra life monitors in Zone 3 along the top path. It'll probably work for the Sega CD version as well but I haven't played that version for years so I'm not sure.
#3. Comment posted by Anonymous on Sunday, 8th January 2012, 4:08pm (UTC)
Side note: Act 3 has what I think is the only major difference between a good future and bad future of any act: an extra loop before the boss.
Hide Notes
Boss
Boss
After a brief course for Zone 3, which will be Good Future or Bad Future depending on whether you destroyed the machines in the Pasts of both previous zones or not, you'll meet Dr. Robotnik, who looks as if he's starting this game with the big guns. He'll slowly drop down on the right in a small mech, complete with spike-footed legs (which should be avoided) and a couple of bumpers on the end of arms being held out in front, and it'll be grey and red in the Bad Future, and a somewhat flamboyant light blue and pink in the Good Future. Fortunately for you, this isn't anywhere near as hard as it looks, and requires only three hits to destroy. When he lands, he'll start walking towards you, and any attempt to attack him will cause you to be bounced back by his bumpers. After a few steps, he'll retreat backwards to the right side, and when he gets all the way back, he'll put the bumper arms away and get ready to charge across to the left, eventually walking at a pace not much faster than what he was doing just now anyway, and only to about two thirds of the way across. Your easiest chance to attack is when he's in the corner, with feet stamping away. One hit to his cockpit will destroy one arm, the other will be gone with a second, and the third will finish off the machine. If you don't attack (probably out of curiosity), he'll just walk back and forth a few times, with bumpers up, and then try and charge again. He'll always leave the far left side of the arena free for you to stand in.
While defending, there's not much you can do but just bounce off of Eggman's bumper hands.
Just three hits though, and he's finished. Dead easy.
Eggman's choice of colour scheme in the Good Future alternative is somewhat more questionable!
Sonic CD's take on the animal capsule. Simply jump into while running along to crack it open.
Eggman will retreat in a jet pack, and now to complete the stage, just head up the following curved wall and drop down through a winding tunnel. When speeding along on the other side, jump into the capsule on the way out to release the flowers and call this stage sorted.
View Notes(8)
Go to..
#1. Comment posted by Anonymous on Wednesday, 11th March 2009, 1:21am (UTC)
you can also attack a much faster way by losing rings and then while you're flashing go under his legs and jump rapidly at him. It saves lots of time.
#2. Comment posted by Monty Eggman on Saturday, 14th March 2009, 2:41am (UTC)
Nabbing one of the Invinciblities at the beginning and then making a break for it towards the end is the best way of defeating the machine, and the best way of possibly completing the act in under 30 seconds (and getting that meaty 50,000 point bonus).
#3. Comment posted by Ajavalo on Sunday, 15th March 2009, 5:10pm (UTC)
Monty Eggman is right.
#4. Comment posted by Anonymous on Saturday, 18th April 2009, 10:18pm (UTC)
For speed runners, grab the shield covering the last red spring, and hurry to the boss. Get behind him, and you will take a hit, but you will be able to hit him three times quickly to defeat him at breakneck speed!

The easiest boss in Sonic History, perhaps?
#5. Comment posted by The Great SonicHolio on Thursday, 21st October 2010, 5:23pm (UTC)
If you don't feel like fighting the boss, run to the right as soon as the zone's music stops, and Dr. Robotnik will land right in front of you. You can land those three hits in less than three seconds.

Source:
http://www.youtube.com/watch?v=U2QmL9DiQgY
#6. Comment posted by Anonymous on Monday, 4th August 2014, 4:28am (UTC)
it has been a while since I played, but I seem to remember being able to jump over his bumpers, I didn't even know he dropped them at all
#7. Comment posted by Anto.G86 on Friday, 24th October 2014, 12:38pm (UTC)
Although the quickest way to defeat this boss is to stand to the far right, the only real safe spot is at the far left of the battle. Robotnik will never charge to the far left of the screen, but if you stand behind him after getting two hits in, he can actually charge BACKWARDS into you for a sneaky hit.

By the way, it IS entirely possible to spin dash over him from the far left of the screen. The only time he drops his bumpers is to charge you. Ironic, seeing that he leaves himself entirely open!
#8. Comment posted by Humanoid on Sunday, 10th May 2015, 3:38am (UTC)
The boss is insanely easy.

Just go to the top of the level and grab the invincibility, get to the boss while you still have invincibility and stay to the right. Then boom boom boom. DONE.
Hide Notes
Each section of this page allows users to add their own notes to fill in any missing details or supply additional research etc.
View general notes for Palmtree Panic (4)
#1. Comment posted by Indigo Rush on Wednesday, 1st April 2009, 11:14am (UTC)
(To Anonymous)
That applies to the whole game, not just Palmtree Panic, so there's a reason that's not included.

I can't think of anything that's missing from this analysis. Good show!
#2. Comment posted by Brandonthehedgehog on Tuesday, 23rd June 2009, 6:40am (UTC)
In the boss, when eggman is coming down, you can go to the far right of the screen and get several good hits out of him without taking damage.
#3. Comment posted by Sonicfan32 on Tuesday, 12th July 2011, 5:27pm (UTC)
The American soundtrack for this game was inspired by a latin jazz song that was popular at the time.
#4. Comment posted by Anonymous on Tuesday, 25th June 2013, 4:37pm (UTC)
In Palmtree Panic zone 1, I found a glitch. When I came out of that giant 3d loop on the beginning of the level, I accidentaly hit the Butterfly badnik. I was actually spinning so I destroyed it and went back in the air. Then I went back to the left, and...
...I landed on (or rather in) the top of the loop the loop!
Hide Notes
Last Updated
Content for this page last edited:
21st February 2009

Files last uploaded for this page:
21st February 2009

Recent Notes
Boss
Posted by Humanoid on 10th May 2015

Boss
Posted by Anto.G86 on 24th October 2014

Boss
Posted by Anonymous on 4th August 2014

General Notes
Posted by Anonymous on 25th June 2013

Point #4
Posted by SonicTailsKnuckles on 21st January 2013

30 notes posted on this page in total